Help:Contents
The wiki guide is an easy-to-follow, step-by-step guide on how to use the wiki. After going through this manual, you should know how to navigate the wiki and follow, change and create pages.
The information that you will find here should be the same information that you will find in the wiki-workshops. If you have suggestions on how to improve this manual, please improve or leave notes on the discussion page.
What is the wiki
The wiki is a tool used by the Belgian Pirates where everyone can contribute and is considered by many to be our memory. The software on which it is based, is the software that is used by Wikipedia, therefore you will find that much of how this wiki works is the same as how things are on Wikipedia. Everyone can search, visit, create, change and follow pages.
The three main uses for the wiki are the
- presentation of information,
- the use as a workspace,
- and archiving material.
In the following we will go further into how you can use the wiki.
Most pages will have links on them that you can follow. There are both external links like this, which will take you out of the wiki, and internal links like this, which will link to a place inside the wiki. Here and there you can also find links to files like this. Just look at the icons next to the link to see the difference.

You can also use the navigation-tools available. As you will see (and can see on the image on the right-side), every page on the wiki that is being loaded, is loaded within a certain frame. This frame consists of a left sidebar, a top header and a search box. You can see links on the left sidebar and in the header. If you are looking for something specific you can always use the search-box.
On the main page you can find a list with events. Every event has it's own page. To get more information on the event, you can visit the page by simply clicking on the event title. Every event has a sidebar with all the important information like what group has organised it, what date time and location is the event. There is even a map and a link to find your route via OpenStreetMap! If there are previous or later events from this type for this group, you'll also see the links Previous meeting and Next meeting. Going to the page of a previous meeting may come in handy in case of meetings to see what was reported on previous meetings.
On the main page you can also click 'Show moarr events!'. This will lead you to the event page where all events are listed. First you'll see all future events, the next section has links to pages for the different types of events, and the last section lists all the events alphabetically.
Pro-tip: You can also export events to your agenda using iCalendar. We have a tutorial for exporting events to thunderbird using iCalendar, and another for exporting events to NextCloud.
***TODO: generaly add more information on navigating; e.g. important pages, search-box...***
Next to navigating you can also follow, create and change pages. For this you need an user account. You don't have to be afraid of accidentally doing things wrong or breaking things. Every change that is made to a page is automatically being kept in a history. When you accidentally break or remove something, it is always possible to do a roll-back so that the page is back to what it was just before your change.
Creating a user-account
On the top right of the page you will see a "create account" link, click on this. You'll be directed to a new page.
The first thing you'll be asked, is to translate a word. This is done to protect against automated account creation. The languages that you can encounter in this little test, are the same languages you'll find on the wiki; namely English, French and Dutch. Next, enter an user name and a password, confirm your password and type your email address. This email address will be used for confirmation and password recovery, so make sure it's a working address. If you want, you can also give your real name, but this is only optional (Beware: this wiki is totally open and public!).
Now, click on the "create your account" button. You'll be directed to a welcome page while a confirmation email is sent to your email address. Go to your mailbox and open this email, if you do not see the email, check you spam-folder. Click the correct link and you'll be directed to your own user talk. Congratulations, you are now logged in! If you ever need to log out or log in again, you will find back the links for this on the top-right of your screen.
Your own User talk
Basically, a user talk is just a wiki-page like any other wiki page. In practice however, this page is used as a place where people can leave you a message. Since we are here now, let's write ourself a message, shall we?
On the upper right you'll see a tab 'edit', click this. Now you can write something, for example type:
Hello fellow pirates!<br>
 --~~~~
On the bottom of the page you'll see a button 'show preview' and 'save page'. Normally you would first click 'show preview', but let us click 'save page'. You will now be redirected to the page you were editing, in this case your user talk. Congratulations you have just edited your first page ;)
You will now see the text 'Hello fellow pirates!' with under it your autograph/signature. So, what have we done here?
You have simply written some text, this is now visible. You have also written <br>, this is used to tell the wiki-software that you want to start writing on the next line. --~~~~ automatically creates your autograph. You can also put a shorter autograph as just ~~~. When you answer to a comment you can also indent your answer. For example, if you click edit again you can answer by typing:
:hello back ;) Nice to see you here!
:--~~~~
You can indent even more by typing multiple ':'. If you want you can play around with this a bit :)
The autographs are used constantly on talk and discussion pages. You'll find them rarely on the regular pages. If you ever want to get to your User talk, simply click on 'Talk' on the top-right of the page.
Following (watching) a page
There will probably be some pages that you would like to follow. This means that you get an email notification every time someone changes the page(s) you are following. You are definitely going to want to do this for your user talk. There are different ways to follow a page. When you look at the upper right of your page, you should see a little star. If this star is blue, you are already following the page. If it is white, you are not following the page. To change the star from blue to white you simply have to click it. Make sure that the star for your user talk is blue, so that you get notified if someone sends you a message. Another way is, when editing a page, to simply make sure the check-box 'Watch this page' above the 'Save changes'-button is checked.
You will also find a check-box 'This is a minor edit', if you check this box, people who follow this page will be notified that this is only a minor update. You can use this for example to correct a spelling error and you don't want to bother everyone with this, however you should not make a habit of checking this too much.
Standard preferences make it so that you get an email for every update on a page you are following, but not for minor updates. To change your preferences, simply click on 'preferences' on the top right of the page. You will then be directed to a page where you can see and edit your preferences.
If you want a quick overview of the pages you are following, you'll find a link 'Watchlist' on the top-right corner of your screen. Here you will come on a page that gives you an overview of changes made on the different pages you follow. On this page you can also 'View and edit watchlist', 'Edit raw watchlist' and even 'Clear the watchlist'.
Creating your own sandbox and user page
Sandbox
On the top-right of the page you'll see a 'sandbox' link. Every user has this. This is a place where you can try out things before putting it on another page. Click this. You'll be directed to a page where you get the message "There is currently no text in this page. You can search for this page title in other pages, search the related logs, or edit this page." This is because this page does not exists yet. On the upper-right, click on 'Create'. You'll see that you can now change the content on the page in the same way like you could for your user talk. Let's type something!
Things that you will often find on a page are titles, subtitles, subsubtitles... You can also find bulletpoints, enumerations and hyperlinks. Let's just use all of these by typing the following:
= section =

This is a section

== subsection ==

This is a subsection. You can go even further with subsub...-sections by adding extra '=', try this ^^

#enumerate
##subenumerate
##second subenumerate
#second enumerate
##subenumerate
*bulletpoint
**subbulletpoint
**another subbulletpoint
*another bulletpoint

simple hyperlink: http://pirateparty.be<br>
external link [http://pirateparty.be using words]<br>
internal link [[Main_Page|using words]]<br>
email address link [mailto:someone@somewhere.be using words]<br>
<!-- This is a commentary and will not be shown on your page -->
'<!--' and '-->' are tags used to tell the wiki-software that you do not want to display this on your page. You can use this for commentary, or to create sections or text that you do not want to be shown yet.
Now, click on the 'Show Preview' button to see what this does. Feel free to play around with this a bit to give you a feel of how all this works :) If you want to save this, simply click the 'Save page' button. In case you did; Congratulations! You have just created your first page ;)
Pro-tip: You don't need to remember all the special characters. On the top of the edit screen there are buttons that you can use. For example if you select a word you've typed and press the button B (on top of the screen, not your keyboard), the text will be surrounded with ''' which means it'll be displayed as bold text.
User page
On the top-right of the page you will see your name. Click this. Now you will be directed to your user page. Again, this page does not exist yet, so we will create this by clicking 'Create' on the upper-right.
You can use this page to give information about yourself, who you are, what crew you are in, how people can contact you, what your interests are, what languages do you speak...
There is not really a standard for making your user page, just be creative ;) And if you want inspiration, you can, of course, always look at other people's user-pages :p We strongly recommend creating a User page, since this is how people can get to know you better.
On the upper-left you will also see 'Discussion', this will lead you to your User talk.
Do more things ^^
Creating events
Now that you know how to make pages, let's use the wiki more actively ^^
When you go to the main page, you can see a whole list of events. You can see an even bigger list on the event page. By adding the Template:MeetingSidebar on a page, you tell the wiki that this is an event page. The wiki automatically lists future events with a link to the correct page.
There are three types of events you can create:
- a pirate drink,
- a meeting event or
- an external event.
The easiest way to create the events is to fill in the correct form and let the wiki auto-generate the event-pages.
Pirate Drinks
Let's start with the simplest event to make: a piratedrink. To do this you just go to the dedicated form, fill in your crew, the date and time of the event, the name of the venue where you will meet up, the address, postal code and city. If you want, you can also add a link to the website of the venue. The address will be used to show the location of the venue on a map. You can see the result here. Pirate drinks will also be displayed on the event and main pages.
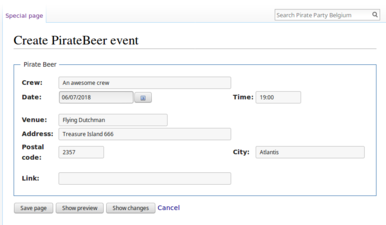
Creation of Pirate Drink
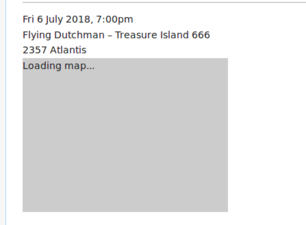
Content of the resulting page


Meeting events
To create a meeting event, things can become a bit more involved. Don't panic now! It doesn't have to be if you don't want to ;) To start you go and fill in the correct form. Instead of crew, you'll now see the option workgroup, this is because events can also be created for squads or projects. So here you just fill in the name of your crew, squad or project. Then fill in the date and time of the event, the name of the venue where you will meet up, the address, postal code and city. Again, if you want you can also add a link to the website of the venue. There is also the option of adding a list with attendees and/or absentees.
Now for the more involved-part ;)
Under this form you can see a template for a wiki page. There is already a 'Details' section, a preparation-section where an example code is given to add a pad (more on adding pads later), an agenda section and a minutes section. Just fill these in as you deem is necessary. Make sure when using a pad, that you choose a new (unique) name for the pad!
These meetings will also be displayed on the event and main pages.

Creation of a Meeting Event
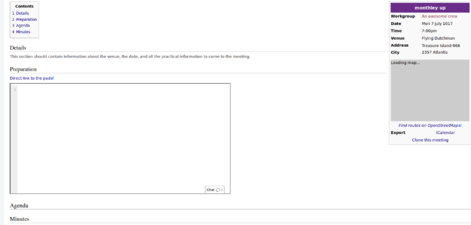
Content of the resulting page


External events
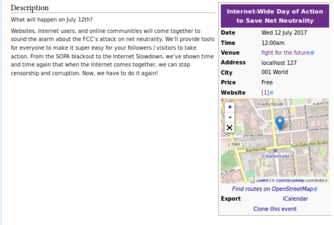
For external events you go to the external event form and fill in the form as you did for an internal event. You'll see two extra options; Price, where you can fill in how much the entrance to the event costs (or just fill in free if it's free entrance) and Website, here you can add a link to a web page of the event. (The option link is still used for a link to the venue).
Under the form you see an almost empty wiki page template. You can give a description about the event here and/or just create the page as you please :)
These events will also be displayed on the external event and main pages.
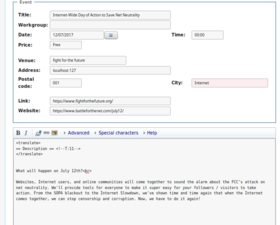
Creation of an external event
Content of the resulting page


Cloning events
Often you'll have a series of events instead of just one event. This is true for pirate drinks and for a lot of meetings. If that's the case, you don't have to recreate the whole event, you can simply clone the previous event. To do this, just go to the page of the event you want to clone and in the sidebar you click on Clone this meeting. You will now be directed to the form with all the data from the cloned event already filled in. All you have to do now is to change the date and change or add other relevant information. Easy enough, no (:?
Adding a list of events on a page
If you have a crew- or projectpage, you may want to have a list with all the events of that crew/project. No worries, we have a tag specially made for that occasion! The following will create a list for all meetings from the group Pirate_Lab:
{{Events|type=Meeting|Pirate_Lab|lang=en|limit=3}}
The result is this:
| Meeting | Date | Venue |
|---|---|---|
| Sat 27 June 2020, 2:00pm | Online – https://talk.parley.be/ | |
| Sat 30 May 2020, 2:00pm | Online – https://talk.parley.be/ | |
| Sat 25 April 2020, 2:00pm | Online – https://talk.parley.be/ |
Show moarr meetings!Add a new meeting
Export for iCalendar
As you can see, there are four parameters that we give. type is the type of event, this can be Meeting, PirateDrink or External. The second parameter is the name of the group of whom you want to list the events. lang is the language that the list will use, this can be en for English, fr for French or nl for Dutch. The last parameter limit is the maximum number of events there will be listed.
You can also include several workgroups and/or types, or you can choose to exclude workgroups or types using the '!' operand.
Examples:
{{Events|A_workgroup, Another_workgroup|type=PirateDrink, Meeting}}
{{Events|type=!External}}
You can also choose to display only future events and show the closest first, with the 'start' and 'order' parameters
{{Events|start=now|order=asc}}
And if you want, you can even display the events on a map whit the 'MapEvents'-tag!
{{MapEvents|Workgroup|type=Meeting}}
Under this list, you'll see that you can now also click Add a new meeting, which will send you to the form of this type of event with the workgroup already filled in.
People can also sort on the different columns by clicking on the column headers.
When there are more meetings than what is listed, you'll also get a link Show moarr meetings! that will redirect you to a page with the complete list of events from this group of this type.
Note: When you get a message like GROUPNAME haven't organized any event yet., then this group either hasn't organized any events of the specified type yet, or you have misspelled the group name and/or event type.
Pro-tip: If you don't want the event list to be smeared all over the width of the page, you can just put the list in a single cell table like so:
{| class="wikitable"
| style="text-align:left;"|{{Events|type=Meeting|Pirate_Lab|lang=en|limit=3}}
|}
Creating a crew page
We ask that every crew creates their own wiki page. You can use this page as a way to tell more about yourself and what it is you are doing or want to be doing as a crew. You can also use this as a workspace by centralising different projects, or use this as an archive where people find information about past events, drinks or elections.
The easiest way to make your crew page, is simply by using the create crew form. Just fill in the details, click 'save page' and a standard crew page will be created for you. You can then change the page to your own liking, however, there are certain conventions that we ask you to follow. Regarding crews, we ask that everyone uses the Crew sidebar. This is both to have crucial information in one easy-to-find spot, but also so that the wiki-software can easily extract certain information, such as the city and coordinates where the crew is located. Those information are then used in this page for instance.
Here we have an example code for the crew sidebar:
{{CrewSidebar
|crewname = An awesome crew
|venue = Flying Dutchman
|address = Treasure Island 666
|postalcode = 9000
|city = Atlantis
|province = North Sea
|region = Atlantica
|members = Jack, Pieter, Mary
|captain = Edward Teach
|navigator = Mr. Smee
|treasurekeeper = Coco the parrot
|socialnetworks= Link Diaspora, Facebook, Twitter, ...
|status = active
}}
For the same reason, you should also add category labels stating your crew's region and province. As an example, we give the tags from Crew BW (French) and Crew Brugge (Dutch):
French:
[[Category:Crew BW]]
[[Category:Crew en Wallonie]]
[[Category:Crew en Province du Brabant Wallon]]
Dutch:
[[Category:Crew Brugge]] [[Category:Crew in West-Vlaanderen Provincie]] [[Category:Crew in Vlaanderen]]
For more inspiration, you can always look at the pages of other crews. There is also a page containing useful templates, where you can choose a template to base yourself on. You can also add your own template there if you want. If you would like to add pictures or a banner, you can always look here or there, or upload your own images if you'd like. An example code for inserting an image is:
[[File:Belgium.png|800px|left|Banner Belgian Pirates]]
Using and inserting a pirate pad
A good collaboration tool is the pirate pad. It's an on-line text editor that people can work on together in real time, without the need of a log in. It's a good tool to use for projects. If you want you can even insert a pirate-pad in your wiki page!
There are different pads that you can use for this, but the ones that we use by default in the wiki are the pads from https://pad.pirateparty.be. To create a pad simply go to the site, give the title you want your pad to have and click 'ok'. If the pad already existed it will now be opened, if not, a new pad with the correct title will first be created. To insert your pad in the wiki, simply use this tag:
<eplite id="TitleOfThePad" />
Where 'TitleOfThePad' is, of course, the title of the pad you want to use.
The 'id' attribute is required, but there are also the optional 'height', 'width' and 'src' attributes. With these you can change the height and width of how the pad is displayed. With 'src', you can set the source for a different server. The following tag has all the attributes set on standard values:
<eplite src="https://pad.pirateparty.be/p/" width="800px" height="400px" id="TitleOfThePad"/>
Servers that you can use are the following:
- https://pad.pirateparty.be/p/
- https://annuel.framapad.org/p/
- https://mensuel.framapad.org/p/
- https://mypads.framapad.org/p/
Because the pads are so easy for everyone to type in, they are also often used as a communication platform on the wiki for non-wiki users. For example, you can make a pad with title 'Crew_Crewname_Discussion' and use that pad in your crew page for people who want to ask questions or leave a message. Be aware however that you do not get automated updates when a pad is being edited, so if you use this, make sure that you check in on the pad from time to time, so that you do not miss any updates or questions.
Creating a project page
The wiki is a good tool to present what you are doing and what is happening inside a group. Therefore, we ask project groups that they make a wiki page as well. It is always a good idea to have an introduction or description of your project, so that people now who and what you want to achieve. On this page people should be able to find:
- what is the purpose of the project,
- what is the current project's timeline,
- who are the people behind it,
- what sub-projects they are working on,
- what do they still want to do,
- when meetings are taking place,
- what is being said or decided on those meetings,
- what money is being spend by the group (if they are spending money),
- how someone can contact people from the project group,
- and all other things that can be relevant.
The sidebar to be used is the following:
{{ProjectSidebar
|projectname = NameOfTheProject
|initiator = Member0
|collaborators = Member1, Member2
|summary = WhatTheProjectDoes
|goals = ObjectivesOfTheProject
|contact = ContactInformationOfTheProject
|active = true
}}
The easiest way to make a project page is to use the empty project template. Just click edit next to the Usage header, copy/paste the code into your own project page and work from there. This will help to get some conformity over different project-pages.
You can find a list of all the projects here.
How to upload files
On the left sidebar under the section 'Tools' you will find 'Upload file'. When following this link, you'll be redirected to the 'Upload page'.
Here, you will first find the explanation on how to link to your file and how to show it as a picture on your page. Under 'Source file' you can select the file from your computer to upload. Under File description you can choose another name for the file if you wish. Try to give it a good name that gives information about the file. You can also give a Summary and choose a Licence. If you do not want to give the upload a Licence, just choose 'None selected'. Under Upload options you can choose 'Watch this file' so that you are notified when revisions are uploaded.
Make sure you know the name of the file, because you are going to need the name to link to this file! A good thing to do would be to already make the tag for your page now.
Click the button 'upload'. The file will be uploaded and you will now be redirected to the page of this file. Here you see the name of the file as a title, some properties, file history and File usage.
If you'd ever want to upload a newer version of the file, you can do this via the link 'Upload a new version of this file' under 'File history'.
You can find a list of all files on the Special:ListFiles page.
Extra resources
What we have shown on this page are the mere basics for navigating the wiki and creating pages. There are much more possibility’s to creating pages than what you have seen here. A good source for extra functionality is simply copying pieces of code from other pages. For example, say you want a link that looks just like the link you saw on another page, well then, just go to that page, click edit, find where the link should be, copy the piece of code used and try it out on the page where you want to use it. You can even try to play around with these pieces of code or tags to see what you can do with them and make it look even better!
Because this wiki uses the same software as the original wikipedia, their help page is also a good source for help. Pages that we think might be interesting on the wikipedia-help are the pages on how to place links on your pages, how to format your text and how to create tables.
For a list of all the forms, we have the Special:Forms page.
And don't forget to follow the conventions as mentioned on the Help:Conventions page ;)
Get extra help
For extra help or just to give us input or remarks, you can, of course, always leave a message on the discussion page, which is the wiki-way ;)
You can also contact us by e-mail (it +@+ pirateparty.be) or on Matrix